Firebase CRUD & Google Authentication with React
Beginners guide to implement Google Authentication and CRUD operations with Firebase in a React application

Firestore database from Firebase is probably the fastest and easiest way to setup up a real-time synchronized back-end these days. But if like me, you are new to Firebase, it can be really overwhelming to figure how to interact with it initially.
So today, in this article I'll try and list down and explain some of the basic methods which you can refer to perform CRUD operations in Firebase from a React application.
What are we going to build?
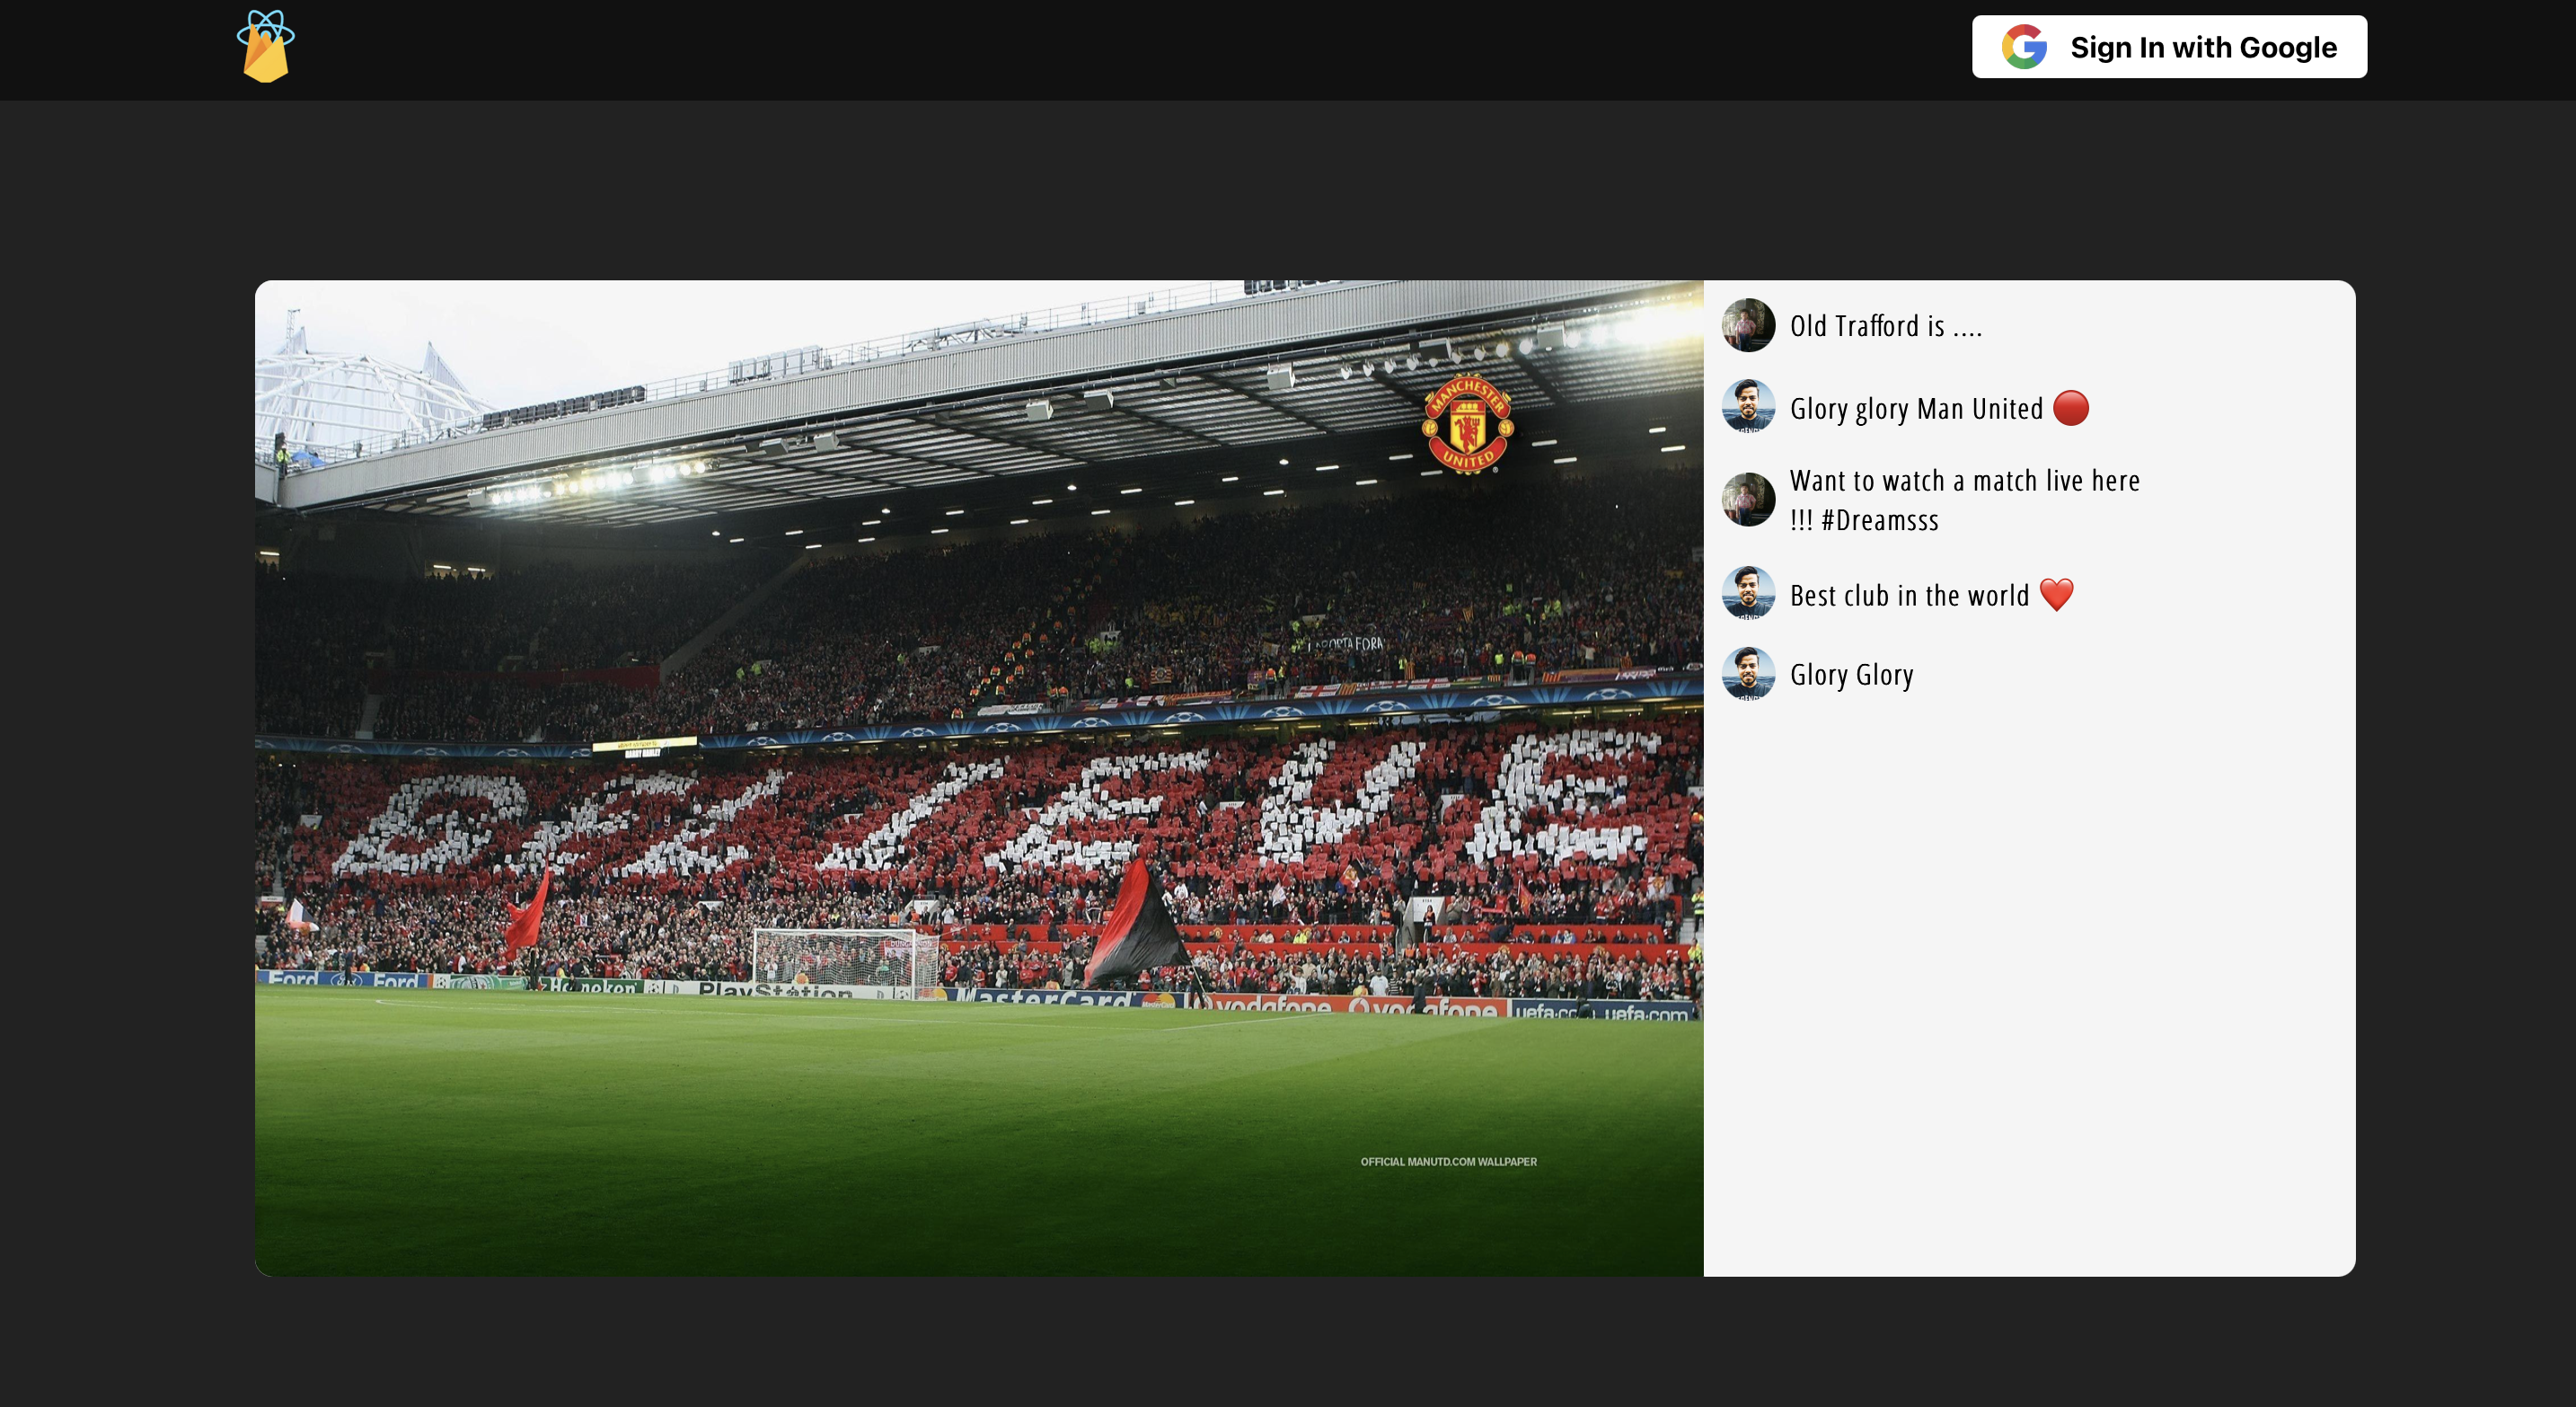
We will be building a simple comment system on an image. For the demo purpose, we will have a single image on which a user can post a comment, modify it and also delete it. To post the comment the user will have to logged-in into the app and for this purpose, we will be using the Google Authentication provided by firebase
Setting up Firebase
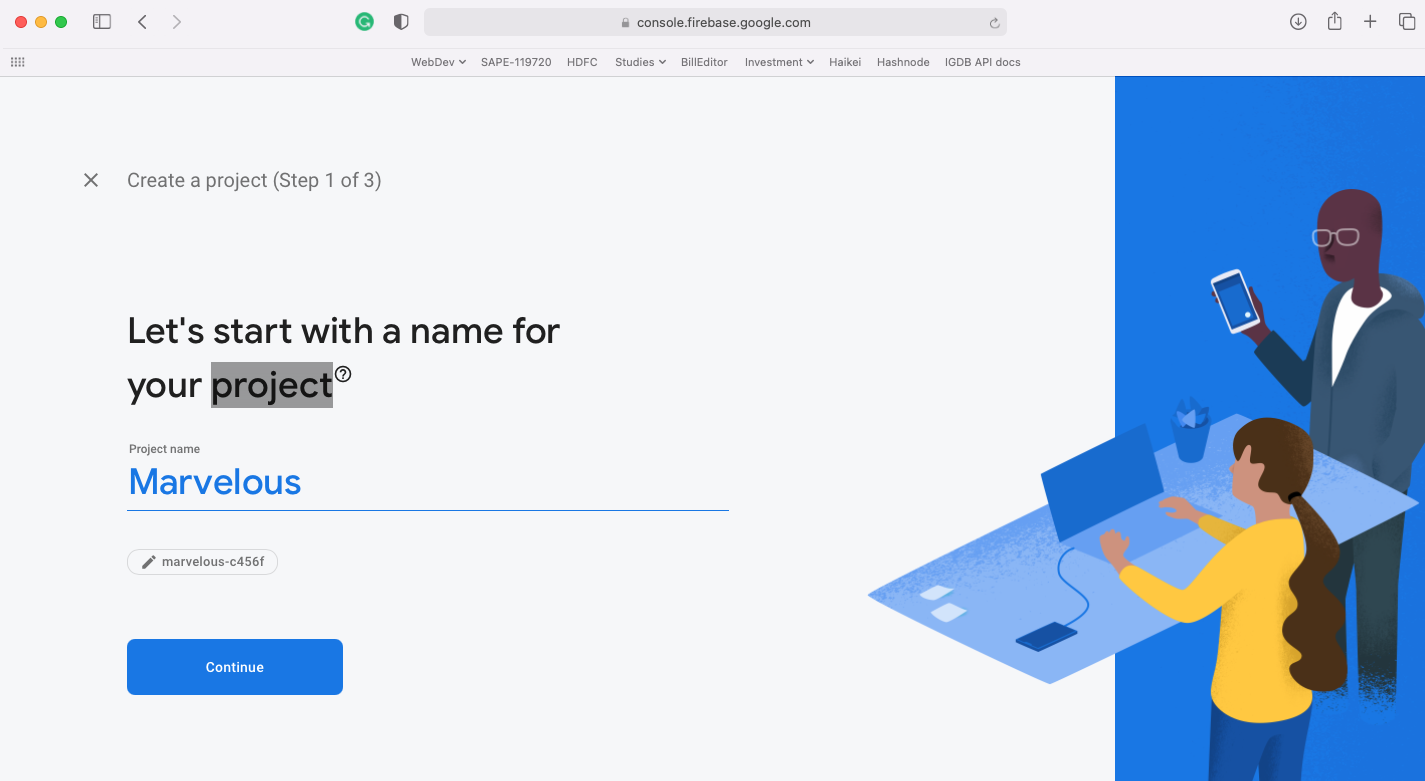
The free tier of Firebase is more than enough for most of our side projects which we start but never finish. All we need is a Gmail account. Head over to Firebase Console and click on create a new project. Enter the project name and click on continue
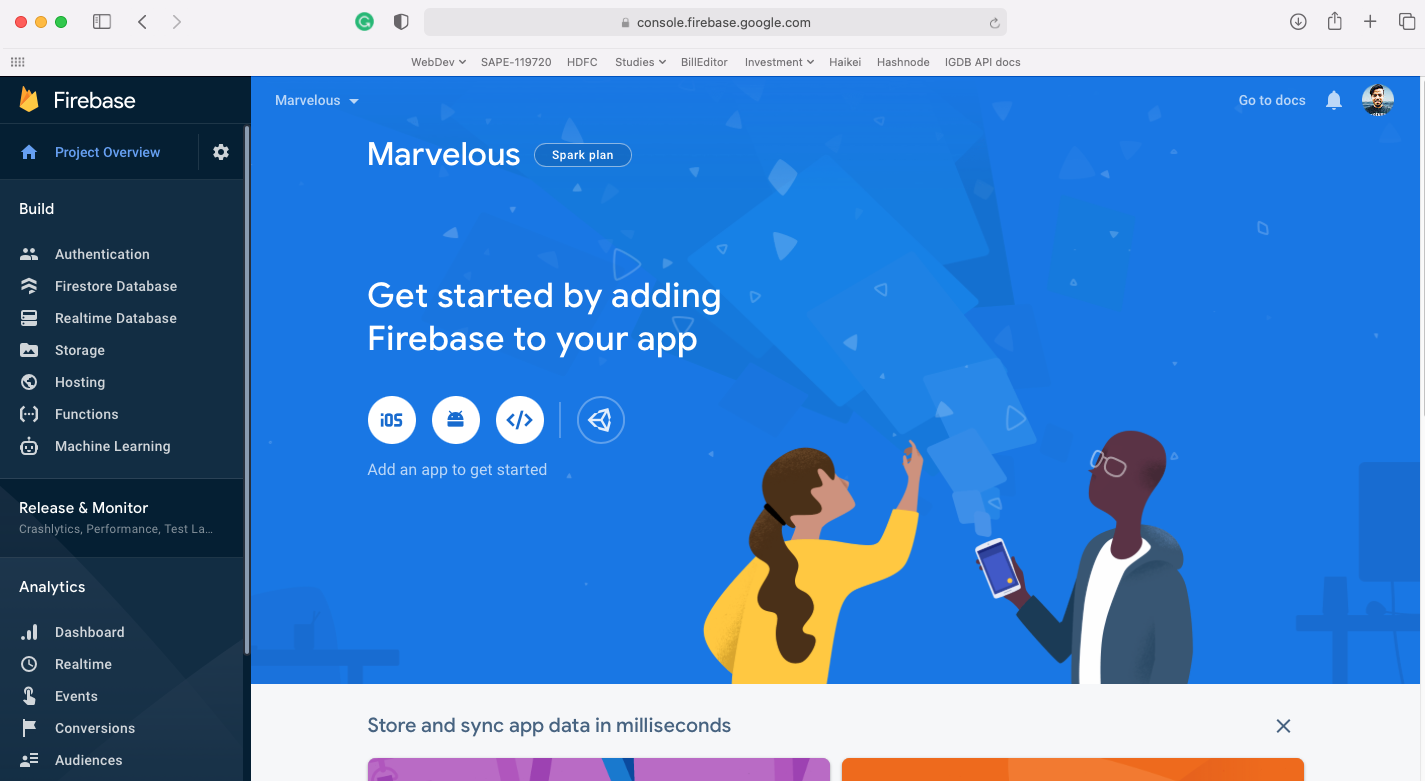
If required you can enable Google Analytics and then click on Continue again. If you wish to enable it then you also need to select the linked Gmail account and wait for the project to be created. Once it is created, select the web app from the options, register the name and get the configurations to use.
All we will be needing to connect our react app to firebase are the below portion from the SDK configurations available on the page
// Your web app's Firebase configuration
  var firebaseConfig = {
    apiKey: "YOUR_API_KEY",
    authDomain: "marvelous-c456f.firebaseapp.com",
    projectId: "marvelous-c456f",
    storageBucket: "marvelous-c456f.appspot.com",
    messagingSenderId: "259587149222",
    appId: "1:259587149222:web:a7e78bd578925787649367"
  };

  // Initialize Firebase
  firebase.initializeApp(firebaseConfig);
Since we will be using the Google Authentication provided by Firebase, let us also enable that. Click on the Authentication menu in the left sidebar. Head over to the Sign-in method tab and enable Google authentication.
Setting Up the React App
We will be using the standard create-react-app template for this guide. Once the project is set up, install the firebase package npm I firebase and create a file named firebase-util.js. This file will be used to configure the connectivity to the firebase database.
import firebase from "firebase/app";
import 'firebase/firestore';
import 'firebase/auth';


var firebaseConfig = {
    apiKey: "YOUR_API_KEY",
    authDomain: "react-firebase-crud-cs.firebaseapp.com",
    projectId: "react-firebase-crud-cs",
    storageBucket: "react-firebase-crud-cs.appspot.com",
    messagingSenderId: "96171658549",
    appId: "1:96171658549:web:3fa3c97e488c7b82cb507c"
};
// Initialize Firebase
firebase.initializeApp(firebaseConfig);

export const firestore = firebase.firestore();

export default firebase;

// for google auth export const auth = firebase.auth();
const provider = new firebase.auth.GoogleAuthProvider();
provider.setCustomParameters({ prompt: 'select_account' });
export const signInWithGoogle = () => auth.signInWithPopup(provider);
The part till google auth is the standard configuration required to perform CRUD operations with firebase. The last 4 lines injects the functionality to use Sign In with Google.
Some FIREBASE 101 before we get started 🚀
In most cases, we will be querying either a collection of data or a single document by its Id. In case we query and expect back a collection firebase returns a promise called QuerySnapshot. When requesting a single document, we get back a DocumentSnapshot.
Below are some of the important properties and methods of both of these snapshots.
QuerySnapshot
- docs => All the documents in the snapshot
- empty => Boolean that lets us know if the snapshot was empty
- metadata => metadata about the snapshot
- query => A reference to the actual query that was fired
- size => The number of documents in the Query Snapshot
- forEach() => Iterate through the docs
DocumentSnapshot
- id => id of the given document
- exists => boolean that lets us know if the document exists
- metadata => same as query snapshot
- ref => a reference to the document in the database
- data() => get all the fields on the document
- get() => get a particular property on the document
Basically, we don't directly get the data back from Firebase. In the case of QuerySnapshot, we would have to either use forEach() or map on docs to get all the records. While for DocumentSnapshot we will be calling the data() to get the actual information expected
Subscription
Firebase is a real-time database, meaning it provides us a two-way capability to automatically refresh the state of our application if the database is modified.
So, for example, you can go to the firebase console and add a comment directly and if on the react side we are subscribed to the changes on the comment collection then we don't need to refresh the page or make a new call to firebase to get the data. Our front-end and back-end will be in sync automatically
Document Structure in Firebase for Storing Comments
- Uploads Collection => containing the image details
- Comment Collection => containing the actual comment, author & the profile image of the author
- User Collection => user profile created on the first login via Google for each user
Note: Comment collection resides inside the Uploads, so one image can have multiple comments
Setting up Google Authentication
With firebase, only one line of code is required to actually implement google authentication, which we have already done. export const signInWithGoogle = () => auth.signInWithPopup(provider);. All we need to do now is to link a click event somewhere and call the signInWithGoogle on that.
This opens a pop-up where users can use their Gmail id and authenticate themselves in Firebase.
import React from 'react'
import './login.style.scss';
import Logo from '../../google.png'
import { signInWithGoogle } from '../../firebase-util.js'

class LoginWithGoogle extends React.Component {
    render() {
        return (
            <div className="google">
                <img src={Logo} alt="" />
                <span onClick={signInWithGoogle}>Sign In with Google</span>
            </div>

        )
    }

}

export default LoginWithGoogle
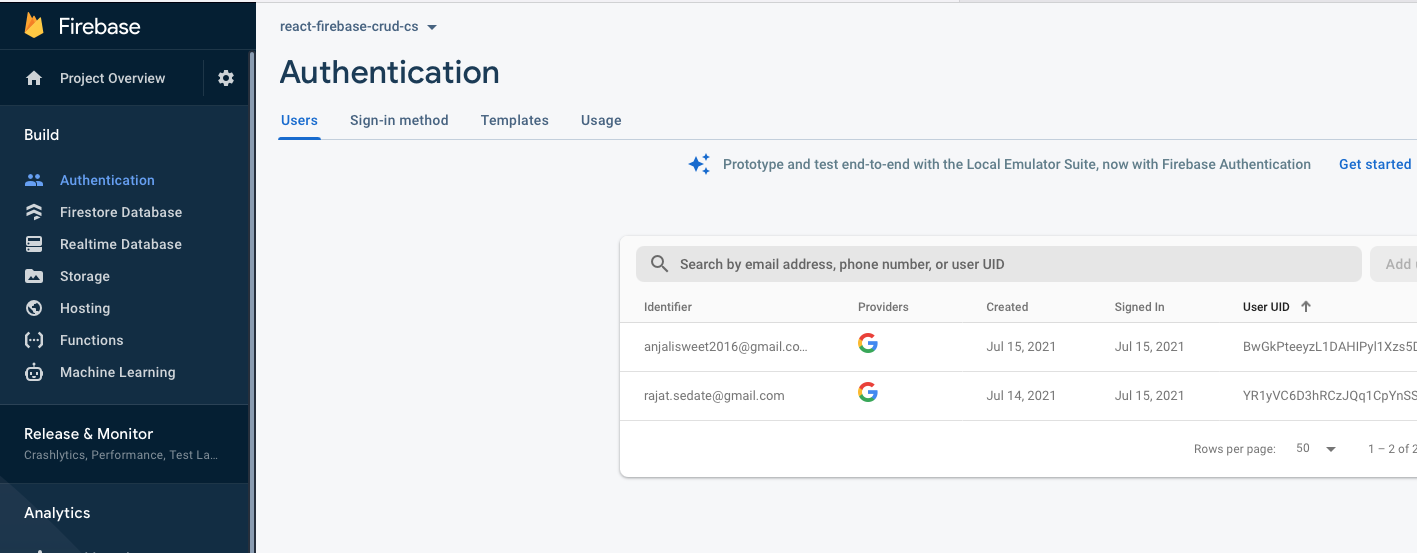
On every user login Firebase internally keeps track of the user along with a UID. This can be seen in the Authentication tab in the Firebase Console
Keeping track of Authenticated User
As of now, users are authenticated in our application but there is no way to keep track of their activities, i.e. when they logged in and logged out. Fortunately, firebase has a snapshot method on which we can subscribe and it is fired every time a user is logged in or logged out into our application.
What we want to do here is, once the user is logged in, we want to check if that user already exists in our database, if not we can create that user. In that way, we will have a user profile to work on. We also want to keep track of the basic information of the user so that we can store it in the application state.
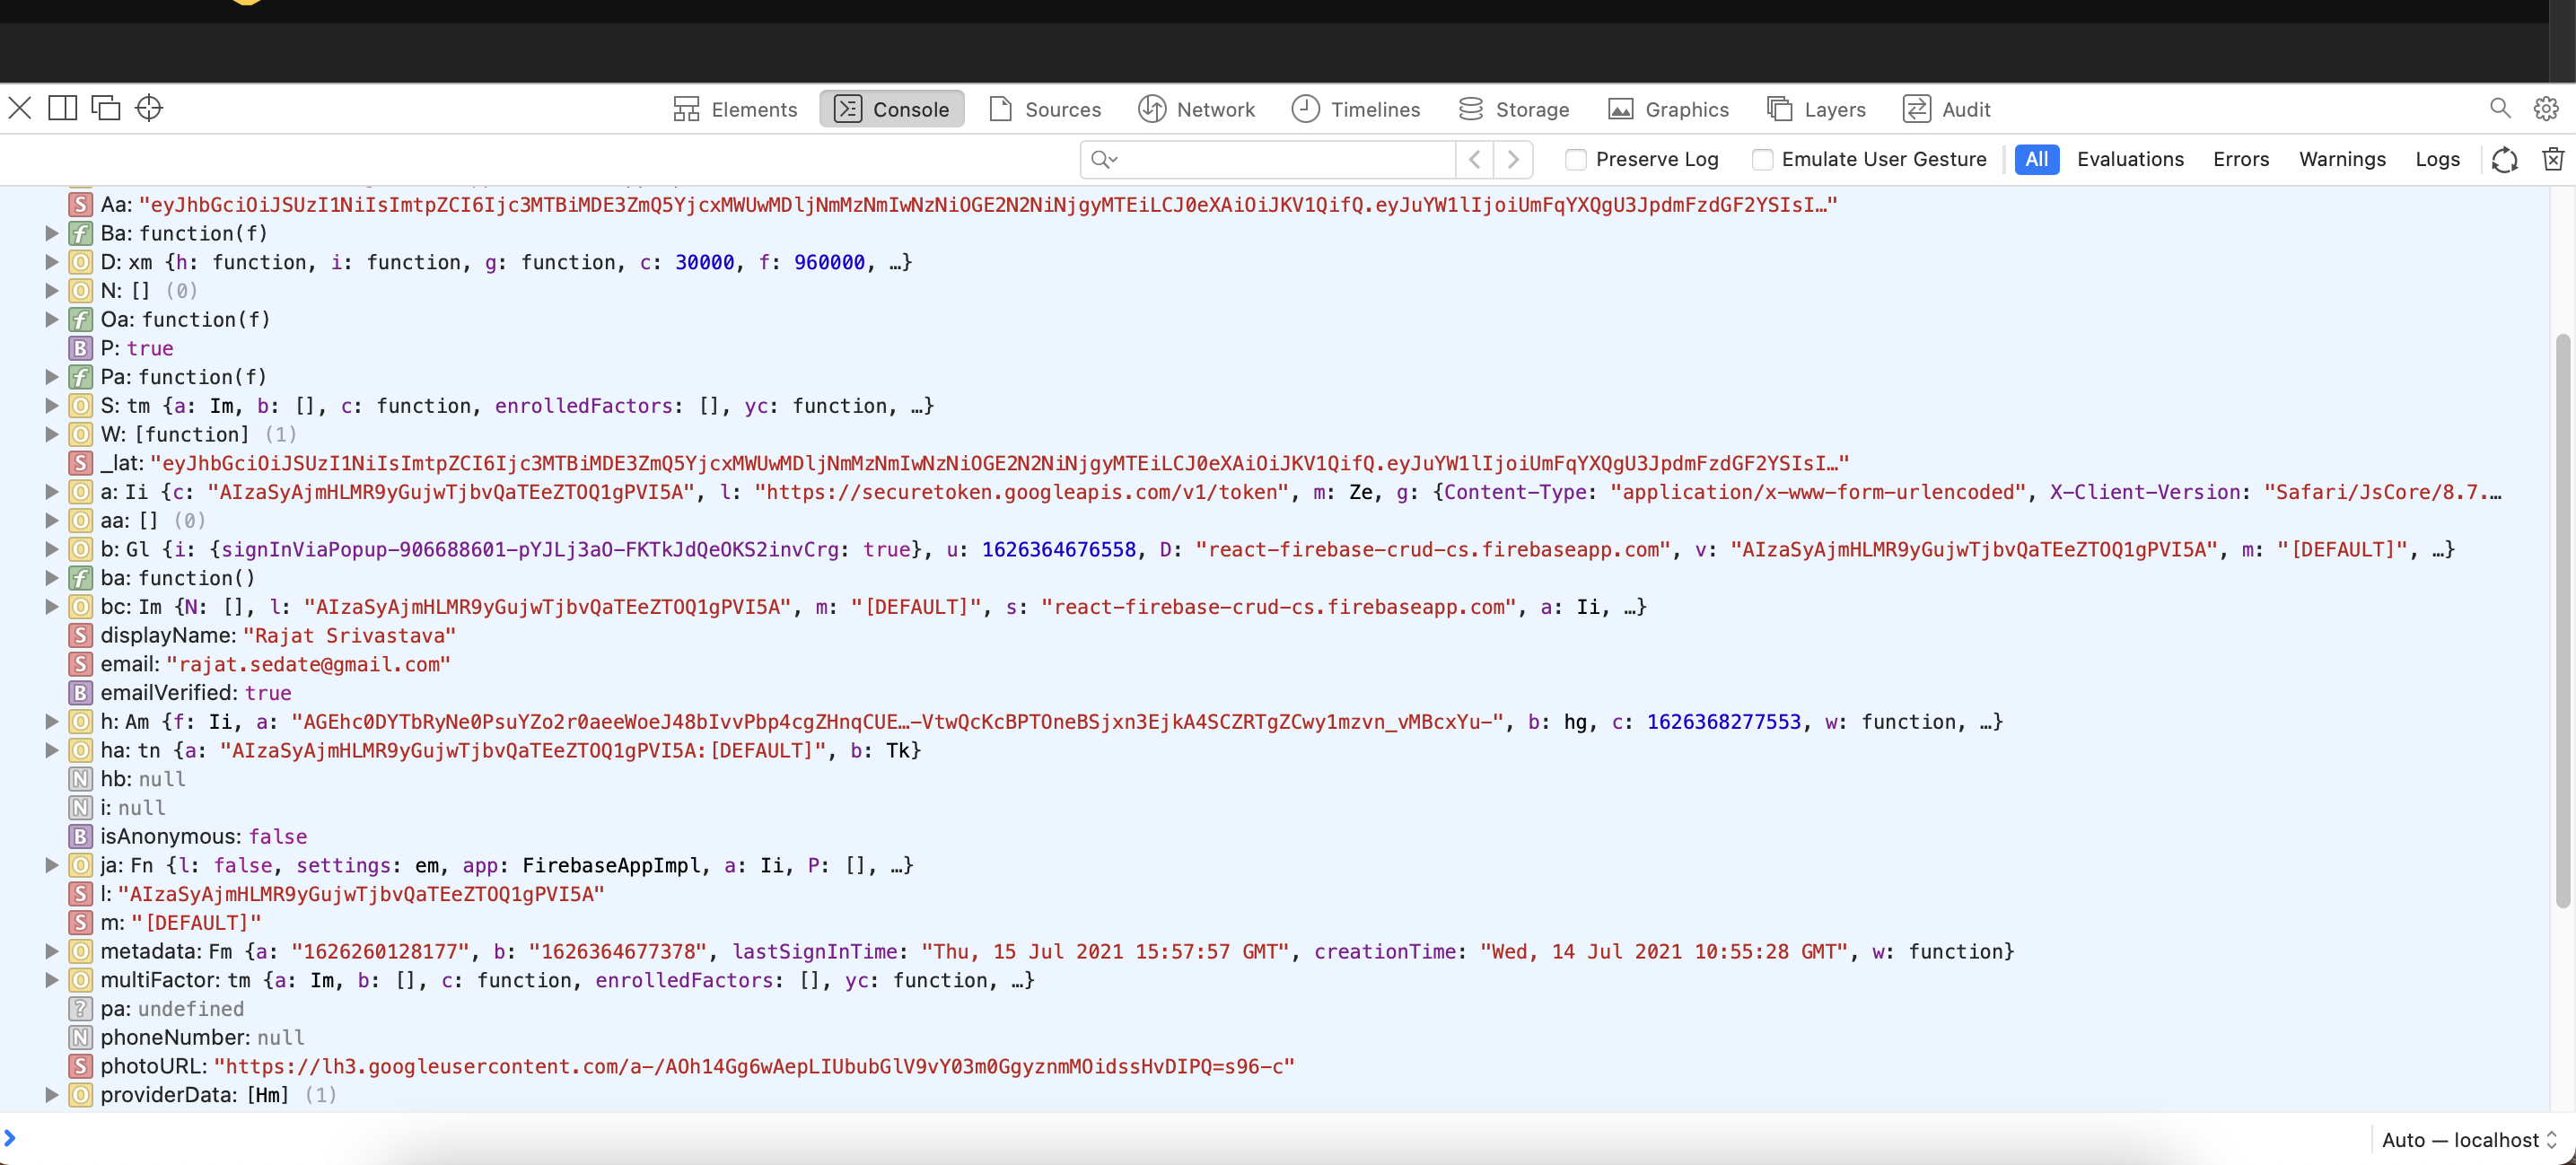
auth.onAuthStateChanged is the method which when subscribed, returns the user object every time a user is logged in and null when the user is logged out. Below is a screengrab of the object returned by firebase. It contains tons of data but what we need for now is just the name, email, UID & the photoURL.
auth.onAuthStateChanged(async user => {
      if (user) {
        const userRef = await createUserProfileInFirebase(user);
        userRef.onSnapshot(async snapshot => {
          this.setState({ currentUser: { id: snapshot.id, ...snapshot.data() } })
        })
      }
      else {
        this.setState({ currentUser: null })
      }
    })
export const createUserProfileInFirebase = async (user) => {
    if (!user) return;   //in case it is signout action, then the user object will be null
    const userRef = await firestore.doc(`users/${user.uid}`);
    const userSnaphot = userRef.get();

    if (!userSnaphot.exists) {
        //check if the user has not been already created before

        const { displayName, email, photoURL, uid } = user;
        const createdAt = new Date();

        try {
            await userRef.set({
                displayName,
                email,
                createdAt,
                photoURL,
                uid
            })
        }
        catch (error) {
            console.error('error creating the user', error.message);
        }
    }

    return userRef;
}
So we first check using the UID if the user document is already there in our users collection. If not then we create a new document using the set method on the user. We then set this user object as the currentUser in our state.
When the user signs out we get null in this subscription and assign the same to the currentUser state.
Note: Since we are directly referring to the user using the UID we know we will be getting back a single document i.e. a document snapshot. So we can use the get() to read the data from the snapshot
Logout
 {
                currentUser ?
                    <div className='signout' onClick={() => auth.signOut()} >
                        <h4 >Logout</h4>
                    </div> :
                    <LoginWithGoogle />
  }
We can directly use the signOut method on the auth object of firebase. This log out the user and triggers the auth.onAuthStateChanged where we are already handling the state
Here, we are just checking the currentUser object on the state. If it is set that means the user is logged in so we want to show him the option to log out & vice versa.
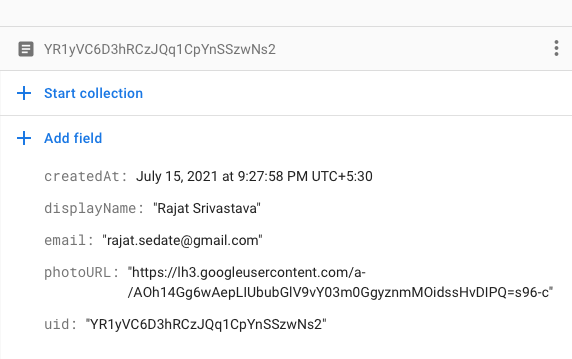
If we now head over to the firebase console we can see the user object created with the fields which we passed on to it.
Reading Comments from Firebase
There are two ways in which we can read data from firebase. First is by manually calling the methods to fetch the data whenever we want to reflect the changes and the other is as we did for login to subscribe for the changes and keep receiving the data.
Note: Although the firebase free tier is huge and possibly more than enough, subscriptions are basically automated get requests so they count against your quota. So be careful and make sure to unsubscribe from them when the component is unmounted to prevent memory leaks
Example to Get data on demand
The two code samples below are not part of the project we are building but are here for reference to see the difference between the methods.
Since we are querying a collection, we have to use the forEach and then the data() on individual documents to get the actual data
Note: Id of the document is not part of the data() and is stored separately hence we are using the map method to create a custom object containing all the required fields together
  const taskSnapshot = await firestore.collection('tasks').get();
  const tasksFromDb = taskSnapshot.docs.map(doc => { return { id: doc.id, ...doc.data() } });
To subscribe to task collection and get updated every time a new task is in any way added to the database, we can alter the code as below.
firestore.collection('tasks').onSnapshot(snapshot => {
const taskFromDb = snapshot.docs.map(doc => { return { id: doc.id, ...doc.data() } });
In our implementation to allow comments to images we want the comments to be visible as soon as they are created so we will be using the onSnapshot() and subscribing to it.
await firestore.collection('uploads').doc('5bRbc5kDPeHssRyeCYVh').collection('comments')
            .onSnapshot(snapshot => {
                let dataForState = [];
                snapshot.docs.forEach((item) => {
                    dataForState.push({ id: item.id, ...item.data() })
                })
                dataForState.sort((a, b) => (a.createdAt > b.createdAt) ? 1 : -1);
                this.setState({
                    imageUpload: [...dataForState]
                }
                )
            })
Since we only have one image as of now I have hardcoded its id to get the exact image document and then the comments collections inside it. We then subscribe to it, map the object to get the ID, and then sort it by the created time so that we can have the latest comment at the bottom. Finally, we can set in the state any way wanted so that it is available to us.
Now every time a new comment is added, this method will be automatically fired, we will get back the new snapshot of the comments collection, our state will be updated and so will be our UI
Creating Comments
Although our read operations are in place, we still not have implemented creation so the collection would be empty. For creating comments, what we have is a simple text box and we want to read the comment, add the currentUser email & photoURL and save it to our database.
   createComment = () => {
        const { currentUser } = this.props;
      addNewComment(this.state.comment, currentUser, '5bRbc5kDPeHssRyeCYVh');
    }
export const addNewComment = async (comment, author, imageId) => {
    const imageSnapshot = await firestore.doc(`uploads/${imageId}`);
    if (!imageSnapshot.empty) {
        const commentRef = await firestore.collection('uploads').doc(defaultImage).collection('comments');
        commentRef.add({ text: comment, author: author.email, profilePic: author.photoURL, createdAt: new Date() })
    }
}
Editing Comments
Now, what we want to achieve is that a logged-in user can update and delete the comment he/she posted. So for this in the comment component, we just match the author property of the comment with the currentUser and if they same we show the delete and update icons else they are hidden.
I am also using the same input to create and update comments so I have added a state variable isEdit to keep track of update operation. On the edit button click, I update the isEdit to true, populate the input based on the ID of the comment.
We will now update our createComment method used earlier to handle updates as well.
createComment = () => {
        const { currentUser } = this.props;
        if (this.state.itemToEdit && this.state.isEdit) {
            updateCommentInFirebase(this.state.itemToEdit, this.state.comment);
        }
        else {
            addNewComment(this.state.comment, currentUser, '5bRbc5kDPeHssRyeCYVh');
        }
    }
export const updateCommentInFirebase = async (id, text) => {
    const commentRef = await firestore.collection('uploads').doc(defaultImage).collection('comments').doc(id);
    commentRef.update({
        text: text
    })
}
Update & Set
There are two in which we can update our document in firebase. Update can be used to target an individual or multiple properties with other properties untouched. While the object passed on to the set method completely replaces the existing property.
For example in our case, only the text will be updated on the comment, and the author, etc will be untouched. But if we had used Set then the comment object would be having only the text field now with all other properties deleted.
Deleting Comment
The final interaction that needs to be done with Firebase is the delete operation. Delete is fairly straightforward. We just need to pass the ID, get the reference, and call the delete()
 deleteComment = id => {
        deleteCommentFromFirebase(id);
    }
export const deleteCommentFromFirebase = async id => {
    const commentRef = await firestore.collection('uploads').doc(defaultImage).collection('comments').doc(id);
    console.log((commentRef));
    commentRef.delete();
}
We now have all our methods wired up to Authenticate, Create, Update, Delete, & Read data from firebase. You can use these methods as references to get started with Firebase. The main thing to remember is how to get the data from firebase based on collection & document.
A demo of the application I created using these firebase methods is below. You can refer to the GitHub Link
Hope this can help you in some way as I had to look into multiple articles to figure out how to perform all these steps in my first React Firebase app.
Keep learning Keep building


