Implement State Management using React-Redux in a Shopping Cart

Hello friends, so I recently started learning React and the biggest takeaway till now has been understanding how we can leverage Redux in our application for state management. It is really overwhelming, to begin with as it requires a lot of initial setup code but from there on it's quite convincing.
I wanted to document my learning and what better way to share it with everyone.
What are we going to do?
We have a demo e-commerce application with just one page listing down six different products. The agenda is to create different actions and maintain states for each of the below use cases
- Add product to cart
- Display the total product count on the cart icon
- Increment/Decrement the product quantity in the cart
- Calculate the total price based on individual price and quantity
- Show/hide cart on click event of cart icon
Live Demo (not responsive): https://react-redux-shoppingcart-demo.vercel.app
Source Code: https://github.com/rajat-srivas/react-redux-shoppingcart
Pre-requisites
Basic knowledge of React & Redux is required as we are going to see the practical implementation of both these concepts together and not going into details about each of them individually
Lets Begin 🚀
Initial Project Setup
I have just used the create-react-app command to create my new react app for this demo. Also, we will be using three packages, Redux, react-redux, and redux-logger. The images and icons used are available on the GitHub repo which has been linked above.
npm i redux react-redux redux-logger
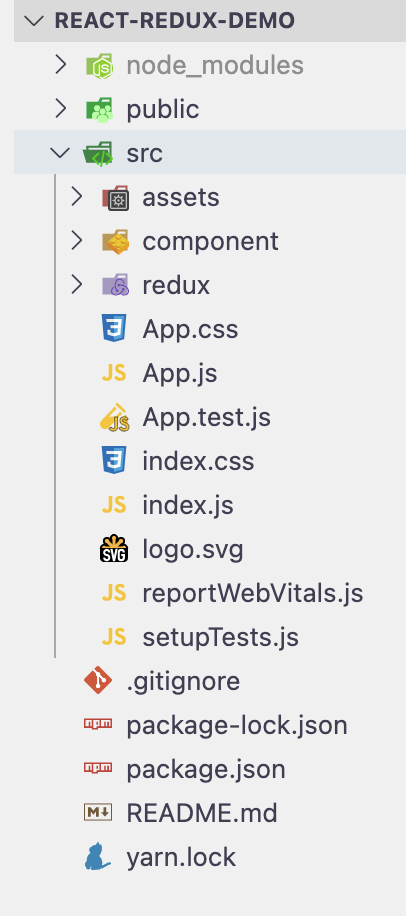
Directory Setup
I have created three folders inside my src directory like below
Product Page & Product Item Component
Let's first quickly set up the products page & individual product components so that we can display our items on the screen.
ProductsItem Component
import React from 'react';
import './product.style.css'

const ProductItem = ({ item }) => (
    <div className="game-card">
        <div className="game-images">
            <img src={item.imageSrc} alt="" />
        </div>
        <div className="game-details">
            <span className="game-title">{item.title}</span>
            <span className="description">{item.desription}</span>
            <span className="price">${item.price}</span>
            <button  className="cta-add">Add To Cart</button>
        </div>
    </div>
)

export default ProductItem
This component is will be used to showcase the individual product on the page. It expects the prop of the item with the details like Id, title, price, description, etc.
.game-card {
  /* max-height: 300px; */
  height: 300px;
  width: 400px;
  display: flex;
  justify-content: center;
  align-items: center;
}

.game-images {
  height: 280px;
  width: 200px;
}

.game-images img {
  height: 100%;
  width: 100%;
  object-fit: cover;
}

.game-details {
  border-radius: 10px;
  background: #fffbfa;
  box-shadow: 20px 20px 60px #d9d5d5, -20px -20px 60px #ffffff;

  padding: 1rem;
  width: 200px;
  height: 200px;
  display: flex;
  flex-direction: column;
  justify-content: space-between;
  align-items: flex-start;
}

.game-details .game-title {
  font-size: 1.4rem;
  font-weight: 700;
  text-transform: uppercase;
  letter-spacing: 2px;
  align-self: center;
  position: relative;
  text-align: center;
  background-color: #ffc600;
  display: block;
  font-family: "Permanent Marker", cursive;
}

.game-details .description {
  font-size: 0.8rem;
  font-weight: 500;
  align-self: center;
  text-align: center;
}

.game-details .price {
  font-size: 2rem;
  font-weight: 600;
  color: #d74444;
  align-self: center;
  text-align: center;
}

.game-details button {
  text-decoration: none;
  color: white;
  border: none;
  cursor: pointer;
}

.game-details .cta-add {
  padding: 0.6rem 0.8rem;
  width: 130px;
  background-color: #d74444;
  font-weight: 500;
  align-self: center;
  font-size: 1.2rem;
  text-align: center;
}

.game-details .cta-add:hover {
  background: #d74444;
  box-shadow: inset 20px 20px 60px #b73a3a, inset -20px -20px 60px #f74e4e;
}

.game-details .link {
  color: #625086;
  align-self: center;
  font-size: 0.9rem;
}
ProductPage Component
This component loops through our product items array and for each item & calls the ProductItem component
import React from 'react';
import './product-page.style.css';
import ProductItem from '../product/product.component';
import { connect } from 'react-redux';


class ProductPage extends React.Component {

    render() {
        const { collections } = this.props;
        return (
            <div className="products-page">
                {
                    collections.map(
                        (item) => (
                            <ProductItem className='product-item' key={item.id} item={item} />
                        )
                    )
                }
            </div>
        )
    }
}

export default ProductPage
As of now, this won't work as we have not implemented the state management logic which allows us to fetch the products from the store. Let's quickly add the styling for this component and then begin with our Redux implementation
.products-page {
  max-width: 1350px;
  margin: 0 auto;
  display: flex;
  flex-wrap: wrap;
  justify-content: space-around;
  align-items: center;
}

.product-item {
  margin-right: 15px;
}
State Management using Redux
Redux basically allows us to have centralized state management so that we can directly access the state in whichever component required. We don't have to worry if the parent component has the state so that it can pass it on to us.
With Redux, the state is available for any component which needs it.
Redux Setup
As mentioned above, redux require quite a few lines of code to bootstrap. So let's first go through that. This portion will be common every time.
Implement Root Reducer
Create file a rootReducer.js and place the following code in it
import { combineReducers } from "redux";
import CartReducer from './cart/cart.reducer';
import ProductReducer from './product/product.reducer';

export default combineReducers({
    product: ProductReducer,
    cart: CartReducer
})
Root reducer is a parent reducer that uses the combineReducers on the redux library to manage all the individual reducers we have. We can directly right all the reducers in this file but then the management won't be difficult and there would be no separation of concerns.
Note: Product & Cart Reducer are the two reducers we will be creating further to manage states related to them
Implement Store
The store is responsible for making the state available globally in our application. Create a file named store.js and add in the code below
import { createStore, applyMiddleware } from "redux";
import logger from 'redux-logger';
import rootReducer from './root.reducer';

const store = createStore(rootReducer, applyMiddleware(logger));
export default store;
We are using the createStore method in the redux library to tell which reducer is our root reducer. We can also pass optional middleware which will be executed every time there is a state change. We are injecting the logger middleware here which logs the before and after states every time it changes and is highly useful.
Update Index.js
Now for the store to be globally available it needs to be involved with the top-level parent of our application. The provider is that parent and the store we just created is passed to it. This makes sure that every component below it in the hierarchy will have access to the store and the states maintained in it.
import React from 'react';
import ReactDOM from 'react-dom';
import './index.css';
import App from './App';
import reportWebVitals from './reportWebVitals';
import { Provider } from 'react-redux';
import store from './redux/store';

ReactDOM.render(
  <Provider store={store}>
    <App />
  </Provider>
  ,
  document.getElementById('root')
);

reportWebVitals();
Let us now implement our first action which allows us to have our products in the state. I have placed the file containing the products inside the folder for the product-page component. It's a file named product-data.js
const Products_Data = [
    {
        id: 1,
        title: 'CyberPunk',
        desription: 'Meet the biggest & baddest of them all',
        price: 49.00,
        imageSrc: 'assets/Products/product1.jpeg'

    },
    {
        id: 2,
        title: 'GTA 5',
        desription: 'Meet the biggest & baddest of them all',
        price: 89.00,
        imageSrc: 'assets/Products/product2.jpeg'
    },
    {
        id: 3,
        title: 'Call of Duty',
        desription: 'Meet the biggest & baddest of them all',
        price: 99.00,
        imageSrc: 'assets/Products/product7.jpeg'
    },
    {
        id: 4,
        title: 'Read Dead',
        desription: 'Meet the biggest & baddest of them all',
        price: 49.00,
        imageSrc: 'assets/Products/product5.jpeg'
    },
    {
        id: 5,
        title: 'FIFA 21',
        desription: 'Meet the biggest & baddest of them all',
        price: 129.00,
        imageSrc: 'assets/Products/product4.jpeg'
    },
    {
        id: 6,
        title: 'Tomb Raider',
        desription: 'Meet the biggest & baddest of them all',
        price: 29.00,
        imageSrc: 'assets/Products/product6.jpeg'
    }
];

export default Products_Data;
Product Reducer & Action
Create a file named product.reducer.js and place the following code in it
import Product_Data from '../../component/product-page/products-data'
const Initial_State = {
    productsCollection: Product_Data
}

const ProductReducer = (state = Initial_State, action) => {
    switch (action.type) {
        case 'Get_All_Product':
            return state
        default:
            return state;
    }
}

export default ProductReducer;
Here, we are setting the initial default state as the Product_Data array which has the list of products.
Reducer basically is a function with two parameters. The first parameter is the current state of the application and the second is the action object which contains the action type which is triggered and the actual payload if required.
We will be calling this initially so whenever the Get_All_Prodcuts is triggered we just want to return the state as is. Since when the first time it is called it will get the initial state and going forward we don't need any change to the products we have
Now let's create a file named product.action.js and create the action which we just specified in the reducer.
const GetAllProductAction = () => ({
    type: 'Get_All_Product'
})
The payload parameter of action is optional and we get that from the initial state so we won't be passing it from here.
Accessing and Dispatching States & Actions
Now that we have implemented our first reducer and action, we need to figure how can we access this state inside our components. So let's update our ProductPage component to receive the products array.
Two things need to be done about it. Firstly we need to import connect from react-redux. Connect is a higher-order function that wraps around our component exports and exposes two methods as parameters. The first parameter can be used to get data from the state and the optional second one can be used to trigger actions causing the state to change
import React from 'react';
import './product-page.style.css';
import ProductItem from '../product/product.component';
import { connect } from 'react-redux';

class ProductPage extends React.Component {

    render() {
        const { collections } = this.props;
        return (
            <div className="products-page">
                {
                    collections.map(
                        (item) => (
                            <ProductItem className='product-item' key={item.id} item={item} />
                        )
                    )
                }
            </div>
        )
    }
}

const getStateForProps = (state) => ({
    collections: state.product.productsCollection
})

export default connect(getStateForProps)(ProductPage);
The method getStateForProps is used to read the product collection object from our state. This method is passed on to the connect as the first parameter.
At this point, our products should be populated from the state.
Cart Reducer & Action
Now we need to create four actions for our cart. Let's add those in the cart.action.js file
export const AddItemToCartAction = item => ({
    type: 'Add_To_Cart',
    payload: item
});

export const ShowCartItemAction = item => ({
    type: 'Show_Cart_Items'
})

export const IncreaseItemCountInCartAction = item => ({
    type: 'Increase_Item_Count_Cart',
    payload: item
})

export const DecreaseItemCountInCartAction = item => ({
    type: 'Decrease_Item_Count_Cart',
    payload: item
})
The first action 'Add_To_Cart' is triggered every time the Add To Cart button is clicked on an individual product. We want to add that particular item to the cart. If the item is already there we want to increase its count.
'Show_Cart_Items' will be a simple action that hides or shows the user cart. By default, the cart would be hidden and only the total item count will be visible. On clicking the icon the state will be toggled and the cart would be shown or hidden
'Increase_Item_Count_Cart' is for increasing the count of items from inside the cart using the
+button'Decrease_Item_Count_Cart' is for decreasing the count of items from the cart using the
-button
Now that we have the actions defined let's implement the reducer with cases for each of them. By default, the cart will be hidden and there will be no items in the cart so both are defined as such in the Initial_State
const Initial_State = {
    cartItem: [],
    showCart: false
};

const CartReducer = (state = Initial_State, action) => {
    switch (action.type) {
        case 'Add_To_Cart':
            return {
                ...state,
                cartItem: addItemToCart(state.cartItem, action.payload)
            }
        case 'Show_Cart_Items':
            return {
                ...state,
                showCart: !state.showCart
            }
        case 'Increase_Item_Count_Cart':
            return {
                ...state,
                cartItem: AddExistingItemToCart(state.cartItem, action.payload)
            }
        case 'Decrease_Item_Count_Cart':
            return {
                ...state,
                cartItem: RemoveExistingItemFromCart(state.cartItem, action.payload)
            }
        default:
            return state;
    }
}

const AddExistingItemToCart = ((cartItems, itemToAdd) => {
    return cartItems.map(item =>
        item.id === itemToAdd.id ? { ...item, count: item.count + 1 } : item
    )
});

const RemoveExistingItemFromCart = ((cartItems, itemToRemove) => {

    const existingItem = cartItems.find(item => item.id === itemToRemove.id);
    console.log(existingItem);
    let newItem = [];
    if (existingItem.count <= 1) {
        newItem = cartItems.filter((item) => (item.id !== existingItem.id))
    }
    else {
        newItem = cartItems.map(item =>
            item.id === itemToRemove.id ? { ...item, count: item.count - 1 } : item
        )
    }
    return newItem;
});

const addItemToCart = ((cartItems, itemToAdd) => {
    const existingItem = cartItems.find(item => item.id === itemToAdd.id);

    if (existingItem) {
        return cartItems.map(item =>
            item.id === itemToAdd.id ? { ...item, count: item.count + 1 } : item
        )
    }
    else {
        return [...cartItems, { ...itemToAdd, count: 1 }]
    }
});

export default CartReducer;
In the addItemToCart method we are checking if the item is already there in the cart, if it's there we are updating the count property on it by 1. If it's not there then we are adding it to the cart and also adding a new property of count with value 1 in it.
In the RemoveExistingItemFromCart method, we are decreasing the count property on the item. We are also checking that if the current count was 1, as then we need to remove that item from the cart. We use the filter method to get everything except that item from the cart for achieving this.
In the AddExistingItemToCart method we are directly finding the item in the cart and increasing the count by 1 for it.
Header Component
Let us now implement the header component which will contain our logo and the cart icon with the counter. In the header component, we need to get the cart value from the state as we want to show the item's count. Also, the cart is shown or hidden based on click on the cart icon present in this component so we will be writing a dispatcher trigger the required action.

import React from 'react'
import { ReactComponent as CartIcon } from '../../assets/cart-icon.svg'
import './header.style.css'
import { connect } from 'react-redux';
import Cart from '../cart/cart.component'
import { ShowCartItemAction } from '../../redux/cart/cart.action';

const Header = ({ cartItems, showCart, showCartClick }) => (
    <div className="container">
        <div className="navbar">
            <h2 className="logo">Gamerz</h2>
            <div className="cart-header">
                <CartIcon className='cart-icon' onClick={showCartClick} />
                {
                    getItemsCount(cartItems) > 0 ?
                        <span className='item-counter'>{getItemsCount(cartItems)}</span> : ''
                }
            </div>
        </div>
        {
            showCart ? <Cart /> : ''
        }
    </div>

)


const getItemsCount = (cartItems) => {
    let cartItemCount = 0;
    cartItems.forEach(item => {
        cartItemCount = cartItemCount + item.count
    });
    return cartItemCount;
}

const getStateForProps = (state) => ({
    cartItems: state.cart.cartItem,
    showCart: state.cart.showCart
})

const mapStateToProps = dispath => ({
    showCartClick: () => dispath(ShowCartItemAction())
})

export default connect(getStateForProps, mapStateToProps)(Header);
We are fetching two states here, the cartItems and the showCart. We have added the mapStateToProps method to get both of these values from the state.
To change the state of the showCart property, we have also implemented the dispatcher which calls the corresponding action. We then map the dispatcher function to the onClick event of the CartIcon.
<CartIcon className='cart-icon' onClick={showCartClick} />
GetItemsCount method just loops through the items in the cart and adds the count property in it to find out the total quantity of products added to the cart.
.navbar {
  display: flex;
  width: 1300px;
  align-items: center;
  justify-content: space-between;
  margin: 0 auto;
}

.logo {
  font-family: "Bigelow Rules", sans-serif;
  letter-spacing: 5px;
  font-weight: bolder;
  color: white;
  background-color: #d74444;
  padding: 5px 10px;
}

.container {
  width: 100%;
  background-color: #ffc600;
}

.cart-header {
  position: relative;
}

.item-counter {
  position: absolute;
  top: -30%;
  padding: 5px;
  background-color: white;
  border-radius: 5px;
}

.cart-icon {
  cursor: pointer;
}
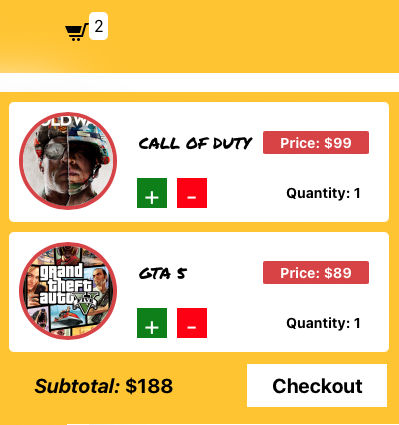
Cart Component
Next, we will implement the cart component which we have already conditionally rendered inside our header component. The cart component will call the cart-item component for each unique item in the cart and also display the total price and have a checkout button which doesn't really do anything.
import React from 'react';
import './cart.style.css';
import { connect } from 'react-redux';
import CartItem from '../cart-item/cart-item.component'


class Cart extends React.Component {


    render() {
        const { cartItems } = this.props;
        return (
            <div className="cart">
                {
                    cartItems.length > 0 ?
                        <section>
                            <div className="cart-products">
                                {
                                    cartItems.map(
                                        (item) => (
                                            <CartItem className='cartitem' key={item.id} item={item} />
                                        )
                                    )
                                }
                            </div>

                            <div className="checkout">
                                <div className="price">
                                    <span className='label'>Subtotal:</span>
                                    <span className='subtotal'> ${getSubtotalPrice(cartItems)}</span>
                                </div>
                                <button>Checkout</button>
                            </div>
                        </section>
                        : <h2 className='empty'>Your Gamerz Cart is empty!</h2>
                }
            </div>
        )
    }
}

const getSubtotalPrice = (items) => {
    let subtotal = 0;
    items.forEach(item => {
        subtotal = subtotal + (item.price * item.count)
    })
    return subtotal;
}

const getStateForProps = (state) => ({
    cartItems: state.cart.cartItem
})

export default connect(getStateForProps)(Cart);
Again we will need the cartItems for the state so we have a written method for it, similar to the one in the header component. The getSubtotalPrice method computes the total price of the cart based on the price and quantity of each item.
We also check to see if there are any items in the cart, if not we show a static text message indicating the same.
.cart {
  width: 390px;
  max-height: 400px;
  background-color: #ffc600;
  z-index: 2;
  position: absolute;
  top: 10%;
  right: 0%;
  padding-right: 10px;
  overflow-y: auto;
  overflow-x: hidden;
}

.cart-products {
  display: grid;
  width: 380px;
  grid-template-columns: 1fr;
  grid-template-rows: auto;
  grid-gap: 10px;
  padding: 10px;
  overflow-x: hidden;
}

.checkout {
  width: 97%;
  padding-left: 10px;
  padding-right: 10px;
  display: flex;
  justify-content: space-between;
  margin-bottom: 15px;
  align-items: center;
}

.price {
  padding: 10px 25px;
  width: 150px;
}

.label {
  font-size: 20px;
  font-weight: bold;
  font-style: italic;
}

.subtotal {
  font-size: 20px;
  font-weight: bold;
}

.checkout button {
  color: black;
  background-color: white;
  border: none;
  font-weight: bold;
  padding: 10px 25px;
  font-size: 20px;
  width: 140px;
  cursor: pointer;
  text-align: center;
}

.checkout button:hover {
  opacity: 0.8;
}

.empty {
  text-align: center;
  color: black;
  font-family: "Permanent Marker", cursive;
  font-style: 14px;
}
CartItem Component
In the CartItem component, we don't need to get any state as the individual cart item is passed onto it from the CartComponent. But, here we will be dispatching two actions to increment or decrement the quantity of the existing products in the cart.
import React from 'react';
import './cart-item.style.css'
import { connect } from 'react-redux';
import { DecreaseItemCountInCartAction, IncreaseItemCountInCartAction } from '../../redux/cart/cart.action';

const CartItem = ({ item, increaseItem, decreaseItem }) => (

    <div className="cart-item">
        <div className="image">
            <img src={item.imageSrc} alt="" />

        </div>

        <div className="info">
            <div className="detail">
                <p className='title'>{item.title}</p>
                <p className='price' >Price: ${item.price}</p>
            </div>

            <div className="counter-btn">
                <button onClick={() => increaseItem(item)} className='plus'>+</button>
                <button onClick={() => decreaseItem(item)} className='minus'>-</button>
                <p className="quantity">Quantity: {item.count}</p>
            </div>
        </div>

    </div >

);

const mapPropsToState = dispath => ({
    increaseItem: item => dispath(IncreaseItemCountInCartAction(item)),
    decreaseItem: item => dispath(DecreaseItemCountInCartAction(item))
})

export default connect(null, mapPropsToState)(CartItem);
We are passing on the item object to the required dispatcher action. Our reducer will get this item and update the count on it based on the action connected.
.cart-item {
  background-color: white;
  width: 360px;
  height: 100px;
  padding: 10px;
  display: flex;
  justify-content: space-between;
  align-items: center;
  border-radius: 5px;
}

.cart-item img {
  width: 90px;
  height: 90px;
  object-fit: cover;
  border-radius: 50%;
  border: 4px solid #d74444;
  flex-basis: 5%;
}

.counter-btn {
  display: flex;
  align-items: center;
  width: 100%;
  flex-basis: 25%;
}

.quantity {
  justify-self: flex-end;
  flex: 1;
  font-size: 14px;
  font-weight: bold;
  text-align: right;
  padding: 8px;
  display: inline;
}

.counter-btn button {
  margin-right: 10px;
  width: 30px;
  height: 30px;
  border: none;
  color: white;
  font-size: 26px;
  cursor: pointer;
}

.plus {
  background-color: green;
}

.minus {
  background-color: red;
}

.detail {
  display: flex;
  align-items: center;
  justify-content: space-between;
  height: 40px;
}

.info {
  width: 260px;
  height: 100px;
  padding: 10px;
  padding-left: 20px;
  height: 80px;
  flex-basis: 65%;
  flex-direction: column;
}

.info .title {
  font-size: 16px;
  text-transform: uppercase;
  background-color: white;
  display: inline-block;
  color: black;
  padding: 2px;
  font-family: "Permanent Marker", cursive;
}

.info .price {
  text-align: center;
  font-size: 14px;
  font-weight: bold;
  display: inline;
  padding: 3px;
  color: white;
  background-color: #d74444;
  border-radius: 2px;
  width: 100px;
}
Conclusion
That is all implementation needed for the requirement which we set out in the beginning. With the code in place, our price, items counts, items in the cart will all be in sync on any action performed.
Below is the screenshot of the sample log which was generated by our middleware
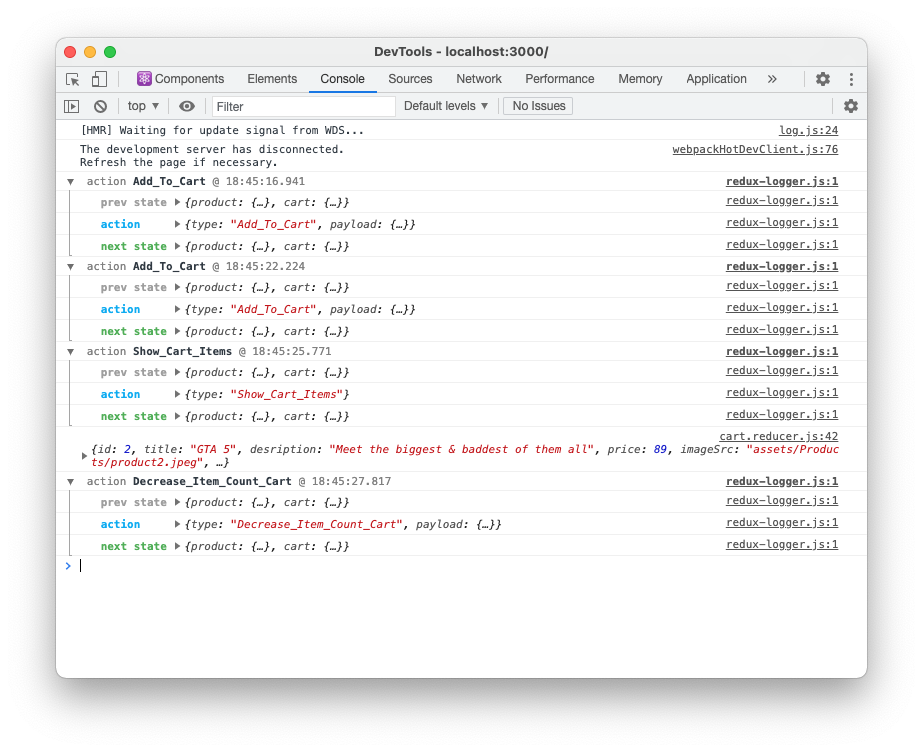
Thanks for your time people, till next time, keep learning keep building.


